Throughout history the bow has been used for hobbies, course competitions, Olympics, hunting, fishing, big game, small game and for birds of flight. They have also been used as offensive and defensive weapons of war and one time to win freedom.
No other weapon had the versatility and world wide impact as the bow. Today there are three types of Bows made: the Recurve Bow, the Long Bow, and Compound Bow. These bows are typically made in shops and in factories. There is also a special type of bow called
the Self-Bow (or Stick Bow). A Self-bow (See Fig. 1) is a bow made fr-om a single piece of wood shaped by an experienced craftsman, named a Bowyer. At times, extra material like horn nocks on the ends or a built up handle are accepted as part of a self-bow.
The Recurve Bow
The Recurve Bow fits the image most common today of what a bow should look like. There are many variations to the Recurve bow but they all have the same style. The recurve curves away fr-om the holder. If you notice the Long Bow, it only curves one way; whereas the Recurve curves like a long bow but then curves back, thus the recurve. Many people seeing a Recurve Bow strings it backwards and when they try to use it, it breaks.

The Recurve Bow
The Longbow
Here’s a great video clip showing how a professional bowyer constructs a longbow (fr-om the show How It’s Made):
The longbow is the most basic bow. It is shaped fr-om
| one piece of wood and the grip is normally made using a strip of leather wound around the bow. A small shelf is cut into the side of the bow for the arrow to rest on. There is no bow sight. Shooting is accomplished by aiming with the tip of the arrow at full draw pointing at the target. Shown below is another example of a longbow. |

The Long Bow
The Compound Bow
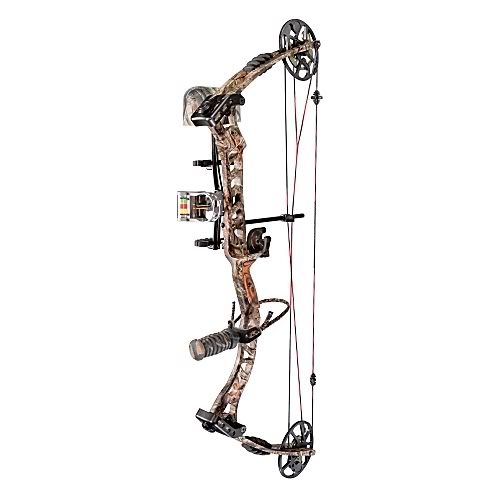
Compound bows are produced exclusively in factories. A compound bow is a modern bow that uses a system of cables, cams and pulleys to draw the limbs back. The limbs of a compound bow are much more rigid than the limbs of a recurve or longbow. This enables the bow to store more energy and to release it quicker and faster than a normal bow. Compound bows vary in length, with end to end (nocks) measurements of 33 to 48 inches. The shorter length is for young shooters, and the longest is for adult use. The compound bow uses eccentric wheels at the end of both limbs to create its power. The bow string itself is connected to the ends of the steel cables, which are attached to the top and bottom wheels. The draw weight is adjustable within a 15 pound range by adjusting the bolts on each limb.
The Compound Bow
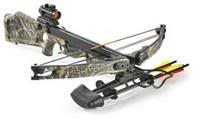
The Cross Bow is illustrated for example only and in many states is considered a weapon similar to a pistol or rifle.

The Cross Bow
A Bowyer is a person who makes bows for archery competition or sport. The term bowyer typically implies a skilled craftsman. Laminated bows, or composite bows, the forms are commonly used for include Recurve Bows and Compound Bows.
The most important part of making a bow is ensuring the materials used are not strained past the breaking point. Due to the large amount of energy stored in a pulled bow, failures often occur especially when using inferior materials or unskilled bowers. Quite often when a bow fails, because there is a lot of stored-up energy, when it fails, it sounds like an explosion because of the loud cracking and some flying debris, including parts of the bow itself.
The choice of making a Long Bow, Recurve Bow or
| a Compound Bow is up to you. Try all three types of bows if you have the chance before you start building one. Using a Recurve Bow is more the accepted traditional method. It has fewer moving parts to adjust and it is easier to tune and maintain. Its main disadvantage is the pull force. The full force of |
the bow is held at full draw only by your fingers so some strength training is needed to control draw force.
Using a Compound Bow is a bit more modern. Its advantage is the let off at full pull. The less effort allows the hold at full pull at the use of a mechanical trigger. It also has more moving parts and a bear to setup and tune.
The two key factors that affect the choice are the size and strength of the bow and are measured by Draw Length and Draw Weight. Draw length should be measured fr-om the nock to the lead edge of the riser at full pull. Draw weight for a Recurve Bow is usually marked on the bottom limb, at a standard draw of 28 Inches.
Recurve Bows range form 48 inches to 70 inches long. Most target bows will average about 66 inches in length. The rough guide to select the length of a bow to fit you; someone with a draw length of less than 28 inches should use a bow between 62 & 66 inches. A person with a draw of more than 28 inches should use a bow between 66 & 70 Inches. The draw weight of the bow is written on the lower back limb. The weight is noted in pounds at full draw of 28 inches and looks like this: #20@28. Twenty pounds of pull at 28 inch pull. Which means at a full pull of 28 inches the force required to hold the bowstring at this length will be 20 pounds. All bows made today use the same basic principles for construction.
For this exercise we will be building a Long Bow
How to make a long bow
Method
In order to make your longbow, you will need to start with a stave of wood (dimensions 1.5″ x 1.5″ x the height of the intended user. The traditional wood for making a bow is yew, for my bows I used ash and it was the easiest wood for me to find. The stave itself can be bought fr-om a supplier, if however you plan to cut it yourself the easiest way is to split a log into quarters, you need to make sure you have a mix of both sap wood and core wood. If available yew wood is the best wood for long bows.
Once you have the stave (the part that will become the back) of the bow was the part that had the bark on it. CAUTION the bark will need to be removed without cutting the wood underneath.
Once this has been decided, you need to mark the stave see figure below and trim off the grey, shaded area using an axe, knife or saw:

In this diagram, the back of the bow is the bottom line of the stave. The length of the ends of the bow is ½” and the height at the mid point is whatever feels comfortable in your hand. However the thicker you make the bow the higher the poundage, I would also recommend that you make it slightly thicker than you think you’ll need it, you can always cut it down.
On the back of the bow, find the mid point of the center line and mark it then draw a straight line fr-om there to each end of the bow. Fr-om the end of these lines, mark 3/16″ either side of the back of the stave, and link them with the ends of the middle line. Trim off shaded area.

On this diagram, you are making the points on the back of the bow. The marker line at the left end of the diagram is 3/16″ and the one on the right is 3/8″. I would recommend using charcoal to do just remember to remove it later.
Now that you have a basic bow shape, you need to trim off the corners of the stave to give a more rounded shape. This is best done with a spoke-shave or a plane. In cross section, this is roughly the shape that you’re after, (remove the shaded areas).

While trimming the bow to match the diagram above, you should ensure that no bulges or dips occur along the length of the bow. To accomplish this, continually look down the length of the bow, working forward as you do. If bulges do occur, smooth them off by light sanding, if dips occur you will need to trim the entire bow to remove them.
It is vital that you try to keep the shape of the bow uniform on both sides at all times; otherwise the bow will not pull correctly.
Once you have reached a stage that you are satisfied with, test the flex of the bow by placing one end on the instep of your foot, your opposite hand on the other end, and pulling the middle towards you with your other hand. Ensure that the back of the bow is facing away fr-om you. As you do this, you will notice some stiff areas of the bow (sometimes it’s easier to get someone else to do this because they can get a better view). Do not try to flex the bow to far as this point, this is not the direction the bow will be bent when strung, this is just to see how much give there is in the wood. Trim down these stiff areas so that the bow flexes evenly up and down its length.
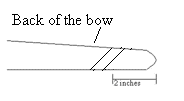
Once you are satisfied that your bow is even and flexes nicely, make some nocks on either end to hold the string. These should be around 2″ fr-om the ends of your bow and are best made using a round needle file. Starting with the side of the bow, make a small mark at 45 degrees, so that the top of the mark is towards the end of the bow see diagram.

Repeat this on the other side of the same end of the bow, and then join them. (See below) Repeat this at the other end of the bow. You could also put horn nocks on the ends, you can purchase these or you can make by hand.

Now that you have created the bow and put nocks on it, you need to teach the wood to bend. This is very important, because if you don’t teach the wood to bend the first time you draw the bow it will snap (LOUDLY).
To teach the wood to bend, you will need to put a string on your bow that is NOT under tension. (See below) and use a tiller see instructions below to make one.
The way a tiller works, is the bow is placed into the space at the top so that it is horizontal with the back, of the uppermost part of the bow. Then pull the bow string slowly down to the first notch. While the string is in this position, examine the bow checking that it is not pulling to one side and that the overall curve is smooth with no straight areas. Mark these stiff areas with a bit of charcoal, gently release the string to its natural position remove the bow fr-om the tiller unstring it and trim the areas marked with charcoal.
Restring the bow put it back onto the tiller and take it to the first notch again. Repeat this as many times a necessary until no stiff areas remain on the bow and the bow curves smoothly. Once you are satisfied take the string to the next notch and perform the same checks/actions.
It is a good idea to let the wood rest for about 15-20 minutes between visits to the tiller so that the sinews within the wood do not start to break.
Once you have reached the fourth notch on the tiller, you can add a little bit of tension to the string. Repeat the slow progression through the notches of the tiller, checking for and trimming any stiff areas until you once again reach the fourth notch. It is very important that these stages are not rushed, or the wood will strain too quickly, the sinews will start to snap and your bow will not reach its full potential or will simply break in half.
Again add a little more tension to the string repeat the checking until you reach the fourth notch. At this point you can put the string under full tension (see below) and work down the tiller. Once you have reached the draw you required for your bow you can put a couple coats of boiled linseed oil on it to protect it fr-om the weather.
Tensioning the Bow
To have a string that is not under tension, simply extend the string so that it is firmly attached in the nocks at both ends of the bow, but the wood itself does not bend.
Tension can be increased by slightly shortening the string, so that the bow bends a little when strung. It is best to shorten the string an inch at a time to increase the tension slowly.
When the bow is at full tension, the distance between the middle of the bow (i.e. where you hold it) and the bowstring, should be the same as your clenched fist with the thumb stuck out.
Bow Strings
When buying bow strings, it is important to remember that three main types are available. These are no loops, one loop and two loops. Personally I have found that one loop strings are best because it is possible for the archer to set the length of the string to be perfect length for their own use. To tie the second loop (for the bottom of the bow) you will need to use a bowers knot (see below). But I prefer to make my own strings.
Testing the Poundage
To test the poundage of a bow, attach a fishing scale to the string while the bow is on the tiller and slowly add weights to it until the string reaches the draw that you require. This will give you the X pounds draw at Y inches required when checking your bow for competition or combat.
If the finished bow is a higher poundage than your require (i.e. you want to use it in combat and it’s too strong), then evenly trim the bow and go back through the routine of checking it on the tiller. On the tiller you will need to draw the bow an inch further than your draw length, this is to ensure that when you fully draw the bow it will not snap.
Making a Tiller
A tiller is the piece of equipment used to train the bow to bend without breaking. It is a vertical piece of wood with a number of notches cut into it at fixed intervals with a semi circle cut out at the top which the bow can rest in. The whole thing is supported on a suitable base.
Bellow is a guide to making a permanent tiller, however you can make them simply fr-om a piece of scrap wood, and this would be cut in accordance to the instructions below and then held in a vice.

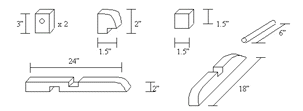
To make a tiller you will need a hardwood plank (1.5″ x 2″ x 8′) and either screws or dowels to join the pieces together.

The first notch should be 7.5″ fr-om the top of the tiller. There should be a distance of 1.5″ between the top of one notch and the top of the next notch and enough notches to draw it to your draw length.

Join all the pieces together as per the diagram above, except for the 1.5″ x 1.5″ block which is tied onto the base piece to prevent the arm fr-om falling over. If this piece is attached, then the tiller will not fold flat.
Safety Tips for Long Bow handling
- Always remember that a loaded bow is a deadly weapon
- Never show your skill by using a human target or permit someone to hold a target for you
- Be sure no one is standing in front of or to the sides of the archer while bow is drawn
- Shoot only at the target. Try first shots at closer distances until comfortable
- Never use arrows that are too short
- Replace bowstring when it becomes worn or frayed
- Always sting your bow properly
- Always use finger and arm protectors
- Never use a target that cannot stop an arrow
Congratulations, you have made your first bow, go out and enjoy it.
Additional Resources and Further Reading
The very first thing I’d recommend you do if you’re serious about bow-making is pick up a copy of Traditional Bowyers Encyclopedia: 2nd Edition (you can get it here fr-om Amazon for a nice discount) by Dan Bertalan, it really is not only THE bow-building encyclopedia, but it’s precisely what you need if you’re just getting started, it’s an excellent guide. Another excellent series of books (there are 4 volumes) I recommend is Jim Hamm’s “The Traditional Bowyer’s Bible”, here’s volume 1 (Amazon has all 4 volumes): The Traditional Bowyer’s Bible, Volume 1
.
Excellent Article on ‘How to make a bow’ (I think it’s a recurve) at WikiHow
