How to embroider a Queen stitch
A queen stitch is a lovely stitches which looks really impressive but is really very simple to do. It’s best worked on counted thread material such as aida or canvas but once you’ve got the hang of it you can actually work it on just about anything. There are a number of variations, but the basic idea is the same.
Two variations are shown below.
Queen stitch with centre line
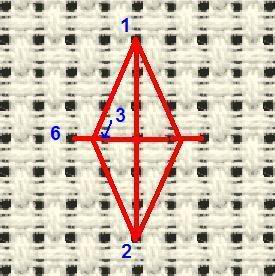
This stitch needs to be worked over an even number of threads from top to bottom. In the example the stitch is worked over six threads. Use the diagrams to follow the instructions.
Bring the thread out at the top of the stitch at the point marked one, and take it back through directly underneath and six stitches down through point two. Hold this long stitch in place by bringing the thread out at three and back in through four, trapping the long first stitch with the shorter second one.
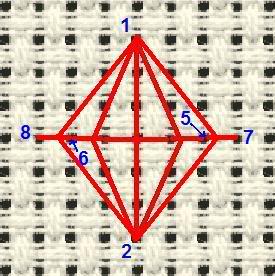
Bring the thread out at point one. This is the same hole you used in the first stage. Take it back through at point two, again just as you did in stage one, but don’t pull the thread tight, instead leave the stitch long and loose. Bring the thread out at point four, and take your long loose thread to the right of your needle before going back through point five. This last stitch will hold the long stitch in place forming the right hand side of a diamond. You may need to play with the tension to get the threads to lay right.
Now do the same but this time on the left hand side. In other words: Come out at one, in at two, leaving the thread loose, out at three and in at six, catching the long thread under this last stitch.
Work another stitch to the right, coming out at one, in at two and holding that stitch in place with a stitch made between five and seven. Next work the stitch to the left, coming out at one for the final time, in at two, and hold that stitch in place with a stitch between six and eight.
That’s your first queen stitch done.
Open queen stitch
This stitch is worked in the same way as the previous stitch but it doesn’t have a centre line down the middle.
The stitches are worked in the following sequence:
- One to two, held out to the right by three and four.
- One to two, held to the left by five and six.
- One to two, held to the right by four and seven.
- One to two, held to the left by six and eight.
Variations
Apart from leaving out the centre line, there are a number of other variations that can be worked to queen stitch. You can vary the number of stitches to the left and right. Two and three are most common but you could have four or even five. Eventually you would be limited by the size of the hole at the top and the bottom of the stitch.
Queen stitch can be worked singly, in rows, blocks or clusters, and you can play around with the spacing. You could experiment with different colours, perhaps using alternate colours or even different colours within one queen stitch although that would be rather fiddly. Queen stitch looks particularly good worked in metallic thread, or in wool on a canvas background.
Happy stitching!
Further Reading and Additional Resources
How to do queen stitched hearts, from The Victoria Sampler
How to do a queen stitch, at Over the Moon Designs, nice short tutorial


